wp8gettingstarted-12

7 tips to get you started with Windows Phone 8

Featuring Windows Phone 8, Nokia’s Lumia line of devices are the flagship phones for Microsoft. If you’re invested in the Microsoft ecosystem, adding a Lumia or other Windows Phone 8 completes the circle quite nicely. If you’re moving from a feature phone, Android, BlackBerry, or iPhone to Windows Phone, here are some helpful tips to get you started.


1.Customize the lock screen and set a password

The first thing you’ll want to do after setting up your service is secure your phone with a password. To do so, go to settings > lock screen then scroll down and turn the password switch on. You’ll then be prompted to enter in a password twice. In settings you can also set up how much time passes before the screen locks itself and a password is required.

Creating a password for your phone will ensure it's secure

Customizing the lock screen is easy too. Launch settings and under system, tap lock screen. Here you have several different options you can combine to make a truly unique lock screen. You can set the background as a static photo, the Bing image of the day, or show the band or artist while music is playing. You can also select which apps you want to show quick status notifications for, such as the calendar, email, or weather.

Here I've set the lock screen to display the Bing image of the day and calendar appointmen...


2.Customize live tiles


Customizing the live tiles is a lot like customizing them in Windows 8.1. Tap and hold a tile until you see icons overlaid on the lower and upper right corners. Tap the arrow icon to change the size, or the tack icon to pin the tile to the main screen. You can change some tiles between small, medium, and large, and others only allow small or medium. While in this mode, you can move the tiles around on your phone too. Moving tiles to the top allows you to see the data that’s most important to you at a glance.

Tap and hold a tile until you see the pin and arrow icon to customize their size and place...


3.Add a microSD Card for more storage

If you want to increase storage on your Windows phone, you’ll need to install a microSD card. A 64 GB card should set you back around US$50. To install it, power off the phone and remove the back and the battery. Then insert the card into the appropriate slot.

To install a microSD card you'll need to pop open the back, remove the battery, and insert...

After inserting the card, put the battery back in and pop the back into place. When you turn on your Windows Phone you’ll see the following message that a card has been found, tap “Yes.” Then to monitor the card storage space go to settings > phone storage and see how much storage space is being used. Here you can also change where media is stored.

Phone storage settings allows you to manage your SD and internal phone storage space


4.Remove useless carrier and manufacturer apps

It’s great when you purchase a new Windows computer at a cheap price, but the savings come with a caveat – tons of junkware apps loaded on the system. That is the case with smartphones too. Luckily, getting rid of extra apps you don’t need or want on Windows Phone is easier than on a PC. From the list of installed apps, press and hold the app you want to get rid of. When the menu pops up, tap “Uninstall,” then verify you want to get rid of it.

Uninstalling useless apps from Windows Phone allows you to clean it up and save space for ...


5.Enable kid’s corner


Getting back to phone security, Microsoft added a helpful feature for parents called kids corner. This lets you create a sandboxed profile for your kids with their own start screen, so they can only access child friendly games, and other items that you specify. Plus, no matter what they hit on the phone, it won’t screw up your important settings. To enable it, go tosettings > kid’s corner. Then go in to each category and check only the items you want them to use.

When you set up kid's corner, only select the apps and other items you want them to have a...

After setting it up, you can get to it by swiping left from your lock screen. Then to leave it, just press the power button.

The kid's corner feature gives your child their own profile of items you specify


6.Back up your phone’s data


Just like with your computer, you need to make sure your phone’s data is backed up. Windows Phone 8 makes it easy to back up and restore settings, your app list, text messages, and photos to SkyDrive. The option to automatically back up is usually activated during initial set up of the phone, but to verify it’s set up or to change anything, go to settings > system > backup. Select anything on the backup list to turn it off or change the settings.
An important backup feature to note is photos and videos. You can have them backed up automatically to SkyDrive and choose the quality. By default it’s set to good quality, but if you want your pictures and videos backed up at high quality, you’ll need to be connected to Wi-Fi. This is to ensure your data usage doesn’t get out of control.

Windows Phone 8 can automatically back up your data to SkyDrive


7.Get to know the Windows phone store


The Windows phone store is laid out nicely and is straight-forward to use. This is where you get not only apps, but music, games, and podcasts. When you launch the store just tap on what you’re looking for. Xbox Music lets you browse through genres and artists and listen to thirty second grabs of new albums. If you’re a fan of podcasts, you’ll find a large selection and can easily browse through them by category.

Xbox music is part of Windows phone store and is one of the better music stores out there

The apps section of the store features categories and what’s popular, top free and best rated lists. It also allows you to search for specific apps. When you find one you want you can read more about it and user reviews. Tap the install button to download it to your phone.

Subscribing to podcasts and downloading apps is intuitive in the Windows phone store


Conclusion


There are a lot of features available in Windows Phone 8, and these tips should help get you up and running with your new phone quickly.

How to root Root your Symphony W20 W30 and some Walton smartphones easily

Symphony Xplorer W30 is one of the full featured smartphones with low price. But you can not get the best of it, until your device is unroot-ed. True android users won't be able to experience the full features of android if their device is not root-ed. By rooting your W30, it will not only increase the performance but also give you the privilege to do anything you want.

Don't worry if your device is still not root-ed. Because I am here to show you how to root your W30. It is very easy and it will not take more than 10 minutes, believe me.


Root access allows you to explore a lot more than you’re normally allowed to do. If you need to know more about what is rooting and what’s the advantage and disadvantage, you should check out the linked article.

Why root Symphony W30


  • By gaining root access, you will void/lose your warranty for your phone.
  • By gaining root access, you can overclock to get maximum performance or underclock to get more battery backup.
  • Root access allows you to do advanced stuff such as increase internal memory on your Android phone.
  • Root access also allows you to use Titanium Backup, DroidVPN to bypass blocked websites and remove unnecessary system apps that do nothing but eat up your phone’s RAM and space.
Enough talking. Now lets get to work!


How to root Symphony W30

  • First connect your Android device to a pc with a USB data cable. And then install driver in your pc. If your pc's operating system is Windows 7, 8 or 8.1, then the driver will install automatically.
  • After installing the USB driver, download Eroot software from this link.
  • Now open the Eroot software and disconnect your W30 from the pc.


How to root Root your Symphony W20 W30 and some Walton smartphones easily

  • Now in your Symphony W30, go to Settings>Applications>Turn on Unknown resources and then again Applications>Development> Turn on USB debugging.


symphony w20 root usb debugging unknown resources

  • Now again connect your Symphony W30 to your pc again the USB cable.
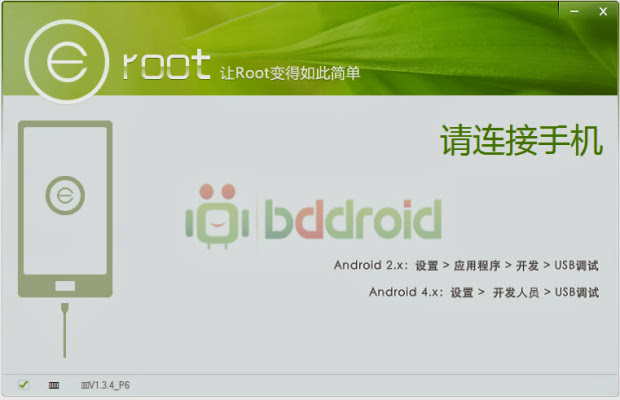
  • Then you will be able to see your device name Symphony W30 in Eroot software. If the software can not detect your phone, close the software and then start it again.
  • When the software detects your phone, click on the Root button. 
How to root Root your Symphony W20 W30 and some Walton smartphones easily

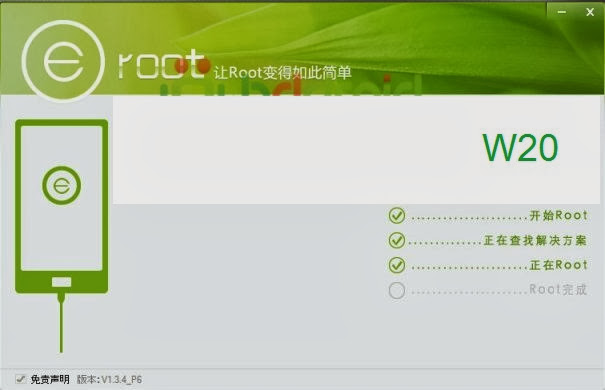
  • Wait for a few seconds to complete. You will see green checkbox on 4 steps in the software.
How to root Root your Symphony W20 W30 and some Walton smartphones easily


Finally you are done!

Congratulations! Enjoy your newly root-ed Symphony W30! You can also root Symphony W20 and some Walton Smartphones using the same process.

If you face any trouble in the whole rooting process, feel free to comment here.

Root your Symphony W20!!

Posted by Unknown On 3:48 PM 1 comment
Symphony Xplorer W20 is the most awaited phone for the root tutorial. Your phone's RAM is always full. Almost all games lag every now and then. You can not remove or uninstall unusual system apps. Don't worry. All these problems are because of your phone is not root-ed.

You have waited for such a long period to root your mobile phone. And I am here to show you how to root your W20. It is very easy and it will not take more than 10 minutes.

Root access allows you to explore a lot more than you’re normally allowed to do. If you need to know more about what is rooting and what’s the advantage and disadvantage, you should check out the linked article.


Why root Symphony W20

  • By gaining root access, you will void/lose your warranty for your phone.
  • By gaining root access, you can overclock to get maximum performance or underclock to get more battery backup.
  • Root access allows you to do advanced stuff such as increase internal memory on your Android phone.
  • Root access also allows you to use Titanium Backup, DroidVPN to bypass blocked websites and remove unnecessary system apps that do nothing but eat up your phone’s RAM and space.
Enough talking. Now lets get to work!


How to root Symphony W20

  • First connect your Android device to a pc with a USB data cable. And then install driver in your pc. If your pc's operating system is Windows 7, 8 or 8.1, then the driver will install automatically.
  • After installing the USB driver, download Eroot software from this link.
  • Now open the Eroot software and disconnect your W20 from the pc.


  • Now in your Symphony W20, go to Settings>Applications>Turn on Unknown resources and then again Applications>Development> Turn on USB debugging.


symphony w20 root usb debugging unknown resources

  • Now again connect your Symphony W20 to your pc again the USB cable.
  • Then you will be able to see your device name Symphony W20 in Eroot software. If the software can not detect your phone, close the software and then start it again.
  • When the software detects your phone, click on the Root button. 

  • Wait for a few seconds to complete. You will see green checkbox on 4 steps in the software.


Finally you are done!

Congratulations! Enjoy your newly root-ed Symphony W20! You can also root Symphony W30 and some Walton Smartphones using the same process.

If you face any trouble in the whole rooting process, feel free to comment here.


When you boot your Windows pc, the first thing you see after the power-on process is the Boot Screen carrying a Windows logo at the center. This is a process during Windows starts loading the required system files to get the OS up and running. Changing this boot logo with a custom image of your choice is not a new concept and there is a lot of softwares available to do this. However, most of these existing softwares don’t yet support Windows 8 and 8.1. Fortunately, there’s now a new tool called 8oot Logo Changer that can replace the default boot logo of both these versions of Windows quickly and easily.


Windows 8 & 8.1 Boot Screen

Using 8oot Logo Changer to change the boot screen is extremely easy. But downloading and installing it on your computer is where you need to pay attention, because it's setup file comes packaged with a ton of unwanted software. Don’t worry – I will guide you on how to avoid that.


Security Warning

During setup, when you are asked if you want to install additional tools with the main app, simply unmark that option and then make sure to click Cancel in the proceeding pop up. Even then, the setup process will try to install other bloatware, so simply decline the offer whenever prompted. You’ll then be asked to select a location to save the file. Once it's setup file is downloaded, you can proceed with the straightforward installation process that doesn’t carry any additional malware.


Download 8oot Logo Changer

You can download 8oot Logo Changer from the following link. Don't worry. It is a free app.


Steps

The main application window of 8oot Logo Changer carries two tabs at the top-left: Bitmaps and Testmode. 

1 First of all, you need to load a new image file that you want to use in place of the default logo. To do that, click the Load Picture button, followed by selecting the image file.


2 If you’re using Windows 8.1, you will also need to turn on Test Signing under the Testmode tab. Test Signing is required to force Microsoft’s latest Windows update to display a custom image, and not doing so will simply display a blank boot screen. To do that, simply navigate to Testmode tab, click the Turn it ON or OFF button and then switch back to the Bitmaps tab.


3 After importing the image into the app, you can select the area that you want to capture by dragging your mouse over the required region. After that, click the right-arrow button under Edited Pictures, which will allow it to generate 6 BMP files. You can also double-click a file from the list to preview the image before applying any changes.

4 The next step is to generate the new bootres.dll file to display the new logo. But before proceeding with that step, you need to backup your current boot image for safety purpose.

Click on the Backup button to create a backup of your original bootres.dll image file. The backup file will come in handy if you ever need to revert back to the original boot logo. 

5 After taking the backup, click Generate bootres.dll, followed by Apply.


6 When you see the following Security Warning dialog, click Yes and then restart your computer for the changes to come into effect.


6 It should be mentioned here that if you have the Test Signing mode turned ON, a Test Mode watermark will appear on the desktop. To hide it, relaunch 8oot Logo Changer, navigate to Test mode tab, and click Backup shell32.dll.mui and Backup basebrd.dll.mui buttons to backup those original files. After that, click the pertaining Patch buttons. Next, click Restart Explorer.exe to hide the Testing mode watermark.


That's it. Now enjoy your new boot screen. If you don't like your new boot screen image, easily you can go back to the previous image from the backup image using the same procedure.


How to make your lipstick long lasting?

Posted by Unknown On 4:19 PM No comments
We all know that awkward moment when suddenly someone is staring at your teeth. You undergo the horrifying torture of the self checklist: Spinach between your teeth? Nope. The attractive red lipstick you’ve worn suddenly smudged all over your pearly whites? Oh yeah. No one likes to have lipstick wear off after just applying it or to have some smeared teeth with lipstick in front of people. It is not only annoying but also humiliating. 

Here are a couple of tips in order to avoid those lipstick-on-the-teeth moments.

Prep Your Pucker

There’s nothing worse than a chapped pout. Try an at-home exfoliating concoction, like 1 tea spoon granulated sugar and ½ tea spoon honey. The sugar gently sloughs off dead skin and honey seals in moisture. Simply sweet!
Not up for mixing? Sara Happ is my all time favorite lip exfoliator The Lip Scrub she created in her kitchen highlights natural and wholesome oils and ingredients. Exfoliate and follow-up with an equally moisturizing lip treatment, like Fresh’s Sugar Lip Treatment in “Clear.

Try Long Lasting Lipstick

There are many brands out there that are long lasting lipstick. This lipstick is formulated to adhere to the lips for a longer period of time even with eating and regular everyday wear. A lot of the time the long lasting lipsticks will leave color on the lips but it is not fresh and vibrant all day long. But it does stay on the lips and if another layer is applied then the second layer stays on even longer than the first.

Invest in Proper Products

When it comes to choosing your shade, look for waterproof and long-wear formulas. These products are specifically created to have staying power through wine and dinner conversations without smearing or repeat touch-ups.

Make a Lasting Impression

This is my technique to ensuring lipstick will last:
  • Outline your lips in a shade that is your natural lip tone or slightly darker. 
  • Shade in the corners to create a adherent for your lipstick.
  • Apply your lip color. 
  • Blot and reapply.

Seal the Deal

Now that your lips are the perfect shade, seal the deal. Take concealer and lightly outline the corners. Then, blend for a perfectly sealed pout. You can lightly dust a bit of translucent powder over the concealer to set everything in place. This not only seals in your shade, but also creates a clean finish with a bit of a highlight for real perfection. Keep this tip in mind, especially when dealing with red, fuchsia and other dark hues, which tend to migrate into fine lines or settle into the corners of your lips.

Dare to be Naughty

Take your index finger, insert it directly in the center of your sealed lips and gently remove. You may find you have a ring of color outlining your finger — that’s the color that threatened to land on your teeth.


Primed, prepared, and perfected!

The best sports game is back on Android with challenging and cold winter edition. The successful series Trial Xtreme has released a brand new episode – Trial Extreme Winter on December 8, 2013. This game has already been nominated for the 8th International Mobile Gaming Awards in the category 'Best Sport Game'. Trial Xtreme 2 Winter edition is the brand new sequel to the Trial Xtreme series, one of the biggest hits on the Android Market with over 25 million downloads to date! It has already gained 4.3 stars out of 5 on Google Play Store.

Game Description:


36 levels, improved graphics, realistic physics engine, intuitive tilt-based controls and stars grabbing that tests your abilities and bike control. Trial Xtreme Winter is all about balance, skill and control as you guide your rider across the ramps, jumps, exploding barrels and obstacles and collect the stars in these brilliantly challenging new tracks. Besides English, this game supports additional language French, German, Spanish, Portuguese, Korean, Russian, Turkish.


Game Features

• Much anticipated sequel to the blockbuster hit Trial Xtreme 2- downloaded 10 million times and counting!
• 36 brand new levels in cold snowy environment.
• Negotiate hundreds of obstacles including ramps, jumbo tires, rocks, planks and more.
• Super detailed new Unity-powered graphics engine brings your rider and the game world to life.
• Intuitive tilt control system using the phone’s accelerometer. Use precision control like never before.
• Ultra-realistic rider and bike physics built on the NVIDIA® PhysX® engine lets you feel it all as you flip, jump, bump and crash your way to victory.

Download

This game size is 50 MB and it is totally free. You can download it easily from the Google Play Store. Click here to download.


There are several softwares, like BlueStacks, to use Android operating system on your computer . But most of them require high configuration and much RAM to run on your pc. So if your computer's configuration is low, these software won't work or these will start lagging. 

But don't worry. I am here to solve your problem. In this tutorial, I will show you how to install Android OS of any version like GingerBread, HoneyComb, Ice Cream Sandwich or Jelly Bean to your computer with low configuration. You will be able to use it with windows or linux operating system. It means, it will not remove your current operating system from your pc, rather it will install individually along with that operating system. So you will be able to run both OS on your computer. And surely, you will be able to uninstall the new OS anytime you want.

Enough talking. Now lets get to work!

Download your desired Android OS

  • First go to this link.
  • You will see some iso files like "android-x86-4.2-20130228.iso"
  • Android x86 means these are 32bit OS and 4.2 means Jelly Bean
  • So if you are thinking to use gingerbread, then find android-x86-2.3 and 4.04 for ICS.
  • Now click on the file link that you want to use. Then download and save the iso file.


Install Android to Hard disk Using UNetbootin

  • Download Unetbootin from this link.
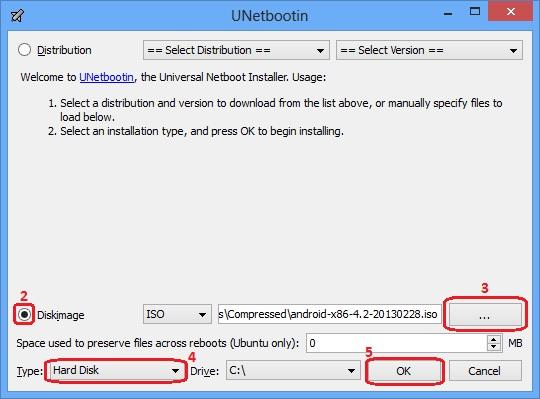
  • Open it. Click on the checkbox diskimage like screenshot given below.
  • Click on the browse button. Go there where you saved the iso file. Select that and then click on the open Button.
  • Click on the 4 numbered dropdown menu shown in the screenshot. Select Hard Disk.
  • Click OK to start installing Android OS to your pc.


After successful installation, click on Reboot to test the newly installed OS or Press Exit if you want to try it later. 

After rebooting your computer, you will see two options. One is your previous OS and another named Unetbootin is your newly installed Android OS. Now select UNetbootin by the arrow key of your computer's keyboard and Press Enter. Wait for a few seconds to load. That's it. 

Now enjoy Your Newly Installed Android OS on your pc!! :)


Apple OS is on the lead!!

Posted by Unknown On 8:51 PM No comments

Newly released iOS 7 operation system (OS) is being used by 74 percentage Apple device users. This new operating system iOS 7 was unleashed in September of this year. And soon it got the attention of the Apple users. Till now, this operating system is leading the smartphone competition.

Mashable.com, a technology related website, said in a report that Apple is the most commonly used operating system. A list of information was posted to the developer support center of that website regarding the operating systems that are being used widely. And this report has been come out from those information. As iOS 7 was quite different from the previous versions, many apple users expressed their displeasure and complained about some bugs. From so recent information, this news is pretty amazing that iOS 7 is on the top list.

Android 4.4 Kitkat on Nexus 4

Recently, the search giant, Google has released a new operating system Kitkat for their android devices. But this OS is lagging behind quite a bit due to problem on using. Mashable informed that this operating system is being used by only 1.1 percent android devices whereas 24.1 percent people are using the three years old Gingerbread operating system on their android phone.

Site search