Showing posts with label android. Show all posts
How to root Root your Symphony W20 W30 and some Walton smartphones easily

Symphony Xplorer W30 is one of the full featured smartphones with low price. But you can not get the best of it, until your device is unroot-ed. True android users won't be able to experience the full features of android if their device is not root-ed. By rooting your W30, it will not only increase the performance but also give you the privilege to do anything you want.

Don't worry if your device is still not root-ed. Because I am here to show you how to root your W30. It is very easy and it will not take more than 10 minutes, believe me.


Root access allows you to explore a lot more than you’re normally allowed to do. If you need to know more about what is rooting and what’s the advantage and disadvantage, you should check out the linked article.

Why root Symphony W30


  • By gaining root access, you will void/lose your warranty for your phone.
  • By gaining root access, you can overclock to get maximum performance or underclock to get more battery backup.
  • Root access allows you to do advanced stuff such as increase internal memory on your Android phone.
  • Root access also allows you to use Titanium Backup, DroidVPN to bypass blocked websites and remove unnecessary system apps that do nothing but eat up your phone’s RAM and space.
Enough talking. Now lets get to work!


How to root Symphony W30

  • First connect your Android device to a pc with a USB data cable. And then install driver in your pc. If your pc's operating system is Windows 7, 8 or 8.1, then the driver will install automatically.
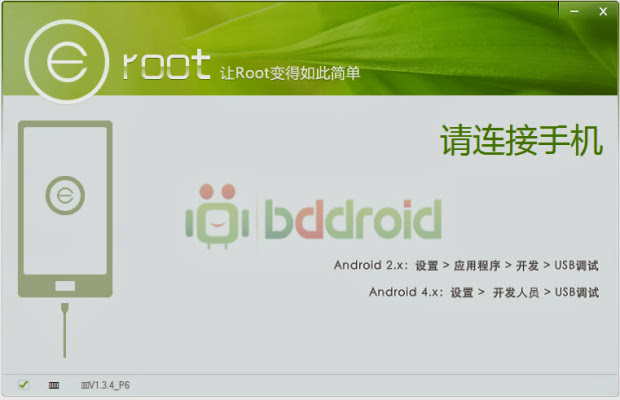
  • After installing the USB driver, download Eroot software from this link.
  • Now open the Eroot software and disconnect your W30 from the pc.


How to root Root your Symphony W20 W30 and some Walton smartphones easily

  • Now in your Symphony W30, go to Settings>Applications>Turn on Unknown resources and then again Applications>Development> Turn on USB debugging.


symphony w20 root usb debugging unknown resources

  • Now again connect your Symphony W30 to your pc again the USB cable.
  • Then you will be able to see your device name Symphony W30 in Eroot software. If the software can not detect your phone, close the software and then start it again.
  • When the software detects your phone, click on the Root button. 
How to root Root your Symphony W20 W30 and some Walton smartphones easily

  • Wait for a few seconds to complete. You will see green checkbox on 4 steps in the software.
How to root Root your Symphony W20 W30 and some Walton smartphones easily


Finally you are done!

Congratulations! Enjoy your newly root-ed Symphony W30! You can also root Symphony W20 and some Walton Smartphones using the same process.

If you face any trouble in the whole rooting process, feel free to comment here.

Root your Symphony W20!!

Posted by Unknown On 3:48 PM 1 comment
Symphony Xplorer W20 is the most awaited phone for the root tutorial. Your phone's RAM is always full. Almost all games lag every now and then. You can not remove or uninstall unusual system apps. Don't worry. All these problems are because of your phone is not root-ed.

You have waited for such a long period to root your mobile phone. And I am here to show you how to root your W20. It is very easy and it will not take more than 10 minutes.

Root access allows you to explore a lot more than you’re normally allowed to do. If you need to know more about what is rooting and what’s the advantage and disadvantage, you should check out the linked article.


Why root Symphony W20

  • By gaining root access, you will void/lose your warranty for your phone.
  • By gaining root access, you can overclock to get maximum performance or underclock to get more battery backup.
  • Root access allows you to do advanced stuff such as increase internal memory on your Android phone.
  • Root access also allows you to use Titanium Backup, DroidVPN to bypass blocked websites and remove unnecessary system apps that do nothing but eat up your phone’s RAM and space.
Enough talking. Now lets get to work!


How to root Symphony W20

  • First connect your Android device to a pc with a USB data cable. And then install driver in your pc. If your pc's operating system is Windows 7, 8 or 8.1, then the driver will install automatically.
  • After installing the USB driver, download Eroot software from this link.
  • Now open the Eroot software and disconnect your W20 from the pc.


  • Now in your Symphony W20, go to Settings>Applications>Turn on Unknown resources and then again Applications>Development> Turn on USB debugging.


symphony w20 root usb debugging unknown resources

  • Now again connect your Symphony W20 to your pc again the USB cable.
  • Then you will be able to see your device name Symphony W20 in Eroot software. If the software can not detect your phone, close the software and then start it again.
  • When the software detects your phone, click on the Root button. 

  • Wait for a few seconds to complete. You will see green checkbox on 4 steps in the software.


Finally you are done!

Congratulations! Enjoy your newly root-ed Symphony W20! You can also root Symphony W30 and some Walton Smartphones using the same process.

If you face any trouble in the whole rooting process, feel free to comment here.


The best sports game is back on Android with challenging and cold winter edition. The successful series Trial Xtreme has released a brand new episode – Trial Extreme Winter on December 8, 2013. This game has already been nominated for the 8th International Mobile Gaming Awards in the category 'Best Sport Game'. Trial Xtreme 2 Winter edition is the brand new sequel to the Trial Xtreme series, one of the biggest hits on the Android Market with over 25 million downloads to date! It has already gained 4.3 stars out of 5 on Google Play Store.

Game Description:


36 levels, improved graphics, realistic physics engine, intuitive tilt-based controls and stars grabbing that tests your abilities and bike control. Trial Xtreme Winter is all about balance, skill and control as you guide your rider across the ramps, jumps, exploding barrels and obstacles and collect the stars in these brilliantly challenging new tracks. Besides English, this game supports additional language French, German, Spanish, Portuguese, Korean, Russian, Turkish.


Game Features

• Much anticipated sequel to the blockbuster hit Trial Xtreme 2- downloaded 10 million times and counting!
• 36 brand new levels in cold snowy environment.
• Negotiate hundreds of obstacles including ramps, jumbo tires, rocks, planks and more.
• Super detailed new Unity-powered graphics engine brings your rider and the game world to life.
• Intuitive tilt control system using the phone’s accelerometer. Use precision control like never before.
• Ultra-realistic rider and bike physics built on the NVIDIA® PhysX® engine lets you feel it all as you flip, jump, bump and crash your way to victory.

Download

This game size is 50 MB and it is totally free. You can download it easily from the Google Play Store. Click here to download.


There are several softwares, like BlueStacks, to use Android operating system on your computer . But most of them require high configuration and much RAM to run on your pc. So if your computer's configuration is low, these software won't work or these will start lagging. 

But don't worry. I am here to solve your problem. In this tutorial, I will show you how to install Android OS of any version like GingerBread, HoneyComb, Ice Cream Sandwich or Jelly Bean to your computer with low configuration. You will be able to use it with windows or linux operating system. It means, it will not remove your current operating system from your pc, rather it will install individually along with that operating system. So you will be able to run both OS on your computer. And surely, you will be able to uninstall the new OS anytime you want.

Enough talking. Now lets get to work!

Download your desired Android OS

  • First go to this link.
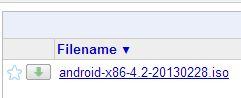
  • You will see some iso files like "android-x86-4.2-20130228.iso"
  • Android x86 means these are 32bit OS and 4.2 means Jelly Bean
  • So if you are thinking to use gingerbread, then find android-x86-2.3 and 4.04 for ICS.
  • Now click on the file link that you want to use. Then download and save the iso file.


Install Android to Hard disk Using UNetbootin

  • Download Unetbootin from this link.
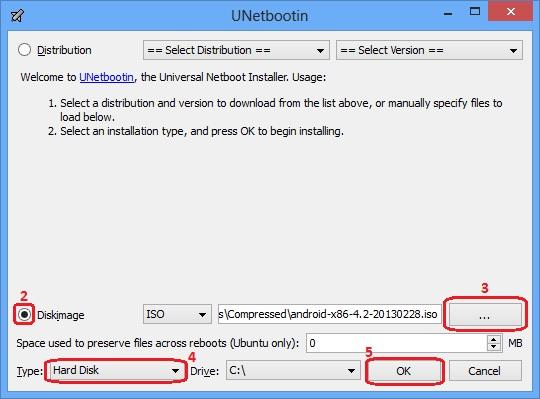
  • Open it. Click on the checkbox diskimage like screenshot given below.
  • Click on the browse button. Go there where you saved the iso file. Select that and then click on the open Button.
  • Click on the 4 numbered dropdown menu shown in the screenshot. Select Hard Disk.
  • Click OK to start installing Android OS to your pc.


After successful installation, click on Reboot to test the newly installed OS or Press Exit if you want to try it later. 

After rebooting your computer, you will see two options. One is your previous OS and another named Unetbootin is your newly installed Android OS. Now select UNetbootin by the arrow key of your computer's keyboard and Press Enter. Wait for a few seconds to load. That's it. 

Now enjoy Your Newly Installed Android OS on your pc!! :)


What is Rooting? [abcd of rooting]

Posted by Unknown On 6:44 PM No comments

From time to time while talking about Android apps and tips, you’ll hear the word “rooting” or “root”. It is seen virtually everywhere wherever you seek for some advanced Android tutorials or stuff. Many new Android users find themselves truly confused about what rooting actually is or how it works or what benefit it has or what disadvantages it comes with. Myself included; when I first bought Android, it wasn’t the first time I heard the word “rooting”. I knew what it was, I just didn’t precisely know what benefits it could bring.

Now that I know, I figured that there has to be a plain simple article describing what rooting is and what it does to the general audience so that everyone with little or no knowledge with advanced computing can understand. Again, this post is intended for giving a very basic idea of rooting and its benefits. If you consider yourself a pro, you might not find much interesting stuff inside.

So, What is Root?


Root is basically a permission. Linux users know it very well. It’s more like the “Administrator” role on Windows computer. With Administrator privilege on a Windows computer, you can virtually do anything and everything (and that includes messing your system files up causing your system to break down). The same level of permission in Linux is called Root. A user, also known as super user, who has access to the core Linux files and the Linux partition (also known as root partition) on the hard drive is called root.

Well, the role is called root. But nowadays, it’s more common to call everyone a root user who has a root-level permission.

So, put it in a stupid simple way, root = super administrator.


Linux & Android


To all Linux haters out there, you may be wondering why I brought up Linux while I was supposed to talk about Android. Well, the Android operating system itself is built upon Linux kernel. The most popular operating systems on Linux kernel are called Ubuntu, Linux Mint, Fedora, etc. They are operating systems based on Linux kernel; they aren’t Linux operating systems.

Linux is the name of a kernel, on which a operating system sits. Android is an operating system targeted for mobile and tablet devices.

So, that’s the link. The root level permission in Linux-based operating systems give users access to everything in the system files. In the same way, the root level permission in [Linux-based operating system] Android gives user the permission and access to do anything and everything with their device. And that’s what root is.

If you root your device, you become it’s God. You control it. You ask it do anything you want it to do. Even if that means burning to death (too much overclocking, coming to it in a bit).


Why Androids Aren’t Rooted by Default


At this point, you may be wondering that why the hell is your device not rooted by default? You spent bucks buying that little piece of device and you got to own it. Well, let’s put it another way that makes rather good sense.

Imagine a not so tech-savvy guy wants to clear his device’s internal memory. Now, he decides to move all files from internal memory to SD card and that includes all the system files as well. Generally, because he’s not a tech guy, he wouldn’t know what should not be moved. He will cut and paste all the files from root folder to SD card, and his device will brick, refusing to work as it should.


As you can see, device manufacturers don’t really know if their customers are tech-savvy or not. They want to make sure that the consumer gets maximum level of performance. So, they lock down the root access so that hells don’t break loose.

I hope now you understand why device manufacturers don’t take the risk of providing rooted device by default. But almost all Android devices can be rooted. Some manufacturers, such as Sony, provide rooting tutorial on their website. So, they support it, but won’t provide it by default for good reason.


Why Root Your Device?

Why you should root your device depends on what you really want. Some people want to overclock and maximize their performance. Some want to underclock and increase battery life. Some people root just to install custom ROMs and change their device’s look and feel entirely. And some other people root just for the sake of rooting for their phones. I rooted at first just for the sake of rooting. But now I’m enjoying the benefits of it.

Let’s find out the benefits of rooting.

Advantages of Rooting

  • Improve performance: Some system applications that improve the device’s overall performance require rooted device to work properly.
  • Overclock: Increase the CPU speed to get maximum possible performance while playing HD games or multitasking.
  • Underclock: Minimize CPU usage while the phone is idle to maximize the battery backup.
  • Managing Apps: By rooting, you will be able to uninstall system apps and also you will be able to convert any user app to system app or any system app to user app.
  • Custom ROM: Ability to install custom ROMs developed by independent developers from around the world.

Disadvantages of Rooting

  • Lose Warranty: Rooting your device will void your warranty immediately with most manufacturers. While there are lots of ways to unroot your device in most cases which can bring the value back to your warranty card, it may not always work.
  • Brick your phone: If something goes terribly wrong, you will end up with a dead phone which is also known as bricked phone. Most bricked phones can be unbricked. However, if the issue was related to hardware, such as overheating and burning issue due to extreme overclocking, that situation is called hard brick and you may never be able to use your phone again. But this is a rare case.

How to Root Your Device?


There are endless devices on the market today. Each devices don’t have the same way for rooting. The best place to search for a rooting tutorial for your device is XDA Forums where senior ROM developers meet general consumers. No matter what device you’re using, there will be tons of tutorials for you to follow along there.

So, tell me, are you clear about what rooting is? Do you think you’re gonna be rooting your phone anytime? Let me know at least, so that I know whether my article helped you or not.

Root Your Symphony W125

Posted by Unknown On 5:51 PM No comments

symphony w125 root

Symphony came back into the android smartphone competition with its first-ever quad-core processor smartphone, Symphony W125. The phone itself is kind of a stunning one. although the build quality might displease lots of people, but performance wise it’s an excellent selection and worth for the money. However, true android users won’t be able to experience the enjoyment in using their smartphones till they gain what's referred to as root access.


Root access allows you to explore a lot more than you’re normally allowed to do. If you need to know more about what is rooting and what’s the advantage and disadvantage, you should check out the linked article. But then again, before you continue, there are a few things you should note.

Why root Symphony W125

  • By gaining root access, you will void/lose your warranty for your phone
  • By gaining root access, you can overclock to get maximum performance or underclock to get more battery backup. 
  • Root access allows you to do advanced stuff such as increase internal memory on your Android phone. 
  • Root access also allows you to use Titanium Backup, DroidVPN to bypass blocked websites, and remove unnecessary system apps that do nothing but eat up your phone’s RAM and space. 

Now, if you’re convinced to root your phone, follow along the rooting tutorial at your own risk.


How to root Symphony W125

  • Things you’ll need to root your precious Symphony W125 are:
  • A computer running Windows/Linux. Moderate knowledge with command line is required for Linux users.
  • Micro-USB cable.
  • Download this file from here. Mirror link: 4Shared
  • First of all, unzip the downloaded file. You’ll end up seeing a screen like the one below.

Turn USB Debugging on by navigating to Settings -> Developer Options -> USB Debugging. You might see a dialogue box, tap yes to continue.

Now, connect your phone using USB cable to the computer. After connecting, you’ll need to install drivers. Please note that if you’re on Linux, you can skip to the rooting process right away. But if you are on Windows, you’ll need to follow the steps below.

Installation of Drivers

  • Go to Computer.
  • Click on System Properties.
  • Click Device Manager from the left sidebar.

  • In the screenshot above, you’re seeing Fly IQ446 because I’ve flashed that firmware on my Symphony W125. In your case, “Symphony W125″ will show up. Right click on that and choose Update Device Software.

  • Click on Browse My Computer For Driver Software.
  • Choose Let me pick from a list of device drivers on my computer.

  • Click show all devices and hit the next button.


  • Now click on the Have Disk button.


  • Now click Browse.


  • Click Locate File and browse to the folder where you’ve decompressed the downloaded files. Navigate into the usb_driver folder and choose android_winusb file. Click open.


    • Choose OK.
    • Choose Android ADB Interface and click Next.


    • At this point, 2 separate windows may show up. Choose OK or Install this driver anyway; depending on which one shows up.
    • If you see a window like the screenshot below, driver installation has just been successfully completed.

    Root Symphony W125

    • Navigate to the downloaded files.

    • Run the file named “run”. Linux users go to terminal and apply the following command on the parent folder “chmod 777 -R w125 root”. Now from within W125 root folder, run the run.sh file by issuing a command “sudo sh run.sh”. If you’re not familiar with command line interface, it’s better and safer to do the whole thing in Windows.
    • Make sure your phone is connected to the computer with USB Debugging turned on. On Windows, after you run the file named “run”, a command prompt identical to the following will show up. Press enter.


    • Wait a few moments. This tool will root your phone and at the end of the process you’ll be required to press Enter in order o reboot the phone. In the screenshot below, it shows failure because my phone is already rooted. If you’ve followed until this carefully, you’ll see success in that screen.


    • After your phone is restarted, open the application drawer and see if there’s an app called SuperSU. If it’s there, your Symphony W125 has been successfully rooted.

    Once your phone has been rooted, you can do countless stuff such as increase your internal storage by link2sd, backup your phone using Titanium Backup, install custom recovery, overclock/underclock your phone and a lot more that you wouldn’t be able to do without gaining root access.


    Now enjoy your freedom as your Symphony W125 now obeys to whatever you want it to do!! ;)

    Site search